
1 Kit 1-Gallon of Epoxy 12 gal. Before I apply the second seal coat I lightly sand the.

How To Get Bubbles Out Of Resin Bubbles Water Bubbles Diy Resin Projects
To apply a seal coat brush on or apply a thin layer of epoxy to the surface.

. A resin and a hardener. It emits low VOCs levels itself produces minimal air. Youve probably seen that after curing release from a mold or noticed that the result is not as planned it does not have a crystal-clear surface but a matte and dull or contain haze finish.
Yellowing resistance helps to prevent the dried and cured epoxy resin from yellowing over time due to exposure to UV radiation humidity and changing air temperatures. Every epoxy has a limit to how thick it can be poured due to this reaction. Reactions Sometimes these bubbles popped due to the reaction between resin photo paper and the adhesive used to mount the paper on the substrate.
Turn the heat source on and hold it roughly 610 inches 1525 cm from. Wait a couple of days for the epoxy to fully cure. This seals pores the table surface and also prevents air bubbles from escapingforming during the flood coat.
Remove Air Bubbles. Most of the woodworkers and artists have worked with epoxy resin before. Now that you have your materials ready heres how to preserve flowers in resin.
Table Top Epoxy Resin is a clear high gloss waterproof epoxy resin coating that protects table tops bar tops and countertops. Stir slowly so you dont get air bubbles. Which was not applicable for my last epoxy resin which took forever to pop micro bubbles and only gave me 10 minute working time.
The picture above shows a quick pass with the torch pops all those bubbles. Here are the most common causes of these bubbles developing in your resin. Add a color coat using a flat leveling tool and remove the air bubbles.
Toothpicks Use these as opposed to larger sticks for arranging your flowers in the mold or for popping air bubbles as your resin cures. These coats seal the wood to prevent air bubbles for the final flood coat. When epoxy is mixed it creates an exothermic reaction.
Toggle navigation 401 396-8199. Mix the hardener and base resin. Which just means it heats up.
For mixing and popping bubbles takes me about 5-10 minutes which gives me plenty of time to mix multiple colors into smaller cups about 20-25 before it starts to thickenharden. You will see some bubbles appear in the mixture but dont get nervous. Hold the flame approximately 6 to 10 inches away from the table top and quickly sweep across the entire surface using an ironing.
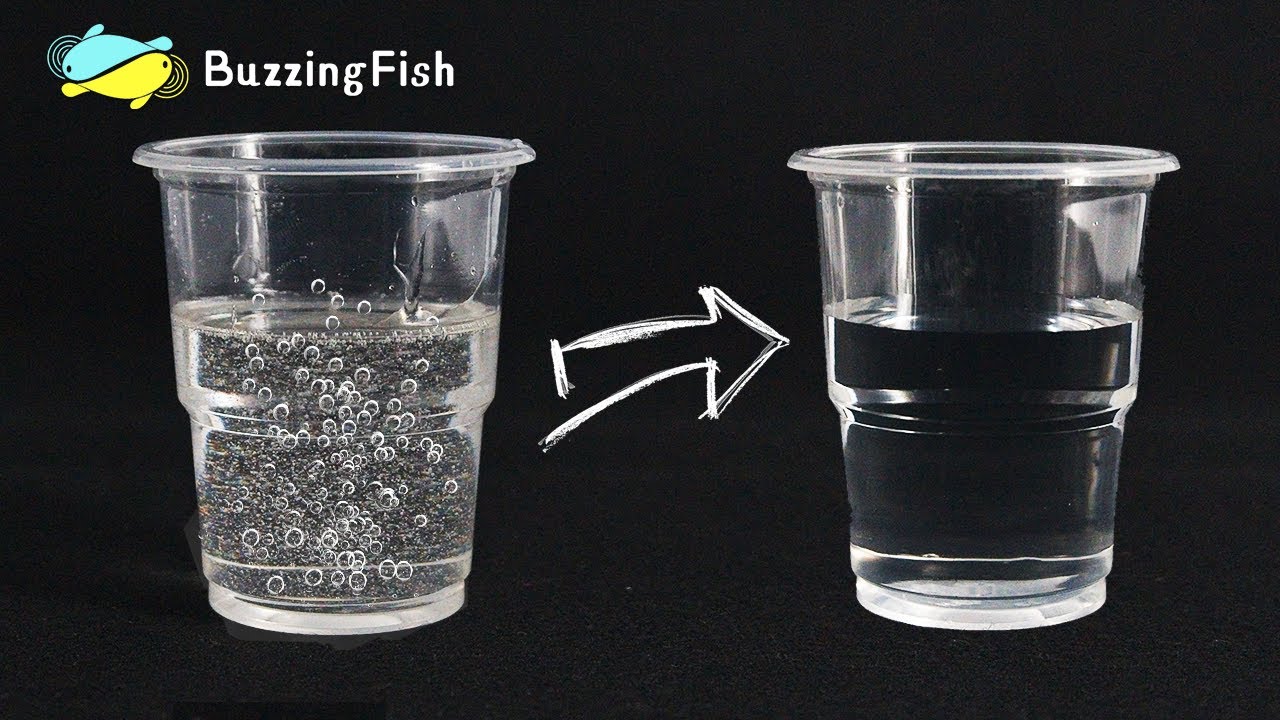
Once you have sufficiently covered the entire surface with your flood coat you will begin the process of popping air bubbles. There are many reasons why these bubbles pop up. In this case the resin is basically a clear synthetic polymer a kind of plastic.
Get rid of air bubbles by moving a heat source over the epoxy. Thankfully there is a simple method to make your resin piece surface shine and give a high gloss finish. After 3-5 minutes pour into a second cup and stir for another 2-3 minutes.
Apply more epoxy to areas that have absorbed the initial seal coat. Liquid Glass epoxy can comfortably get to around. Air bubbles are an inevitable part of pouring epoxy but you can get rid of them using a heat gun torch or hairdryer.
Bubbles are one of the biggest issues when you hear resin craft. Allow Table Top products or resins to stand alone for 5 to 10 minutes until bubbles have risen to the surface then lightly mist Bubble Buster over that surface and watch the bubbles disappear. The epoxy resin finish is now ready.
A few minutes after applying the seal coat observe the sealed material. Choose an even surface to do your project on like a kitchen table or work table. An epoxy resin coating is a two-part product.
This prevents air bubbles from coming out of the substrate while the flood coat is applied later. How an epoxy resin coating works. The table below shows Working Time Tacky to Touch Set to Touch Demolding Time and Full Cure for a 72x8 casting poured to the maximum recommended depth of 15.
Any leftover bubbles will get hit with a heat gun when we do our flood coat. When it comes to epoxy table top finishes one-size-fits-all does not apply. Used to release air trapped near the surface of Table Top Epoxies.
Most of them will be released during the curing process. These products remain clear. Ambient temperature was 21C with 50 RH.
Factors to Consider for the Perfect Finish. The more epoxy mixed the hotter it will get. Pour Part A into a container using the plastic utensils the epoxy comes with.
As the epoxy heats the bubbles escape and come to the surface. It remains liquid until its mixed with the hardener and then it cures. Once the color coat has set 24 hours add a clear coat on top.
The best tool for removing bubbles is a small propane torch. The seal coat is very important and is a small batch of Bar Table Top Epoxy that is brushed on the table in a thin layer. Its a very simple.
STEP 4 SEAL THE SURFACE. Resin 12 gal. Once dry you can sand down the surface and clean it with a wet cloth.
The Pro Marine Clear Table Top Epoxy Resin can be applied to virtually any surface including laminates solid wood stone and metal. This casting size 14L is meant to represent the typical dimensions of the epoxy portion of a river table project. Our 1 to 1 Epoxy Activator forms an easy to.
All epoxy resins consist of these two-part systems which ensures your resin will cure.

Water Bright Is A Fragment Venician Wood And Resin Light Of Variable Intensity Reveals Underwater Air Bubbles Insi Resin Furniture Wood Resin Table Wood Resin

How To Fix Bubbles In Cured Resin Resin Obsession Diy Resin Crafts Resin Jewlery Resin Jewelry

Malibu 17 Lazy Susan In 2022 Functional Art Perfect Holiday Gifts Solid Walnut

Resin And Wood Decor Ambient Night Light Resin Table Decor Etsy Epoxy Resin Wood Resin Crafts Resin Furniture

Pin On My Crafts

How To Fix Bubbles In Cured Resin Resin Obsession Diy Resin Crafts Resin Crafts Resin Crafts Tutorial

Prepping The Walnut Crotch Slab For Our Next Epoxy Pour Painted The Sides Cracks Punky Wood With 1 1 Epoxy To Preven Coffee Table Pallet Coffee Table Wood

10 Tips For Getting Rid Of Resin Bubbles Resin Obsession Resin Bubble Epoxy Resin Diy Resin Diy
How To Get Bubbles Out Of Epoxy Resin Adafruit Industries Makers Hackers Artists Designers And Engineer Resin Crafts Resin And Wood Diy Epoxy Resin Wood

Water Bright Is A Fragment Venician Wood And Resin Light Of Variable Intensity Reveals Underwater Air Bubbles Inside The Res Bright Lamp Epoxy Resin Wood Lamp

Water Bright Is A Fragment Venician Wood And Resin Light Of Variable Intensity Reveals Underwater Air Bubbles Inside The Resin Art Epoxy Resin Art Bright Lamp

How To Mix Epoxy Resin And Hardener To Have Minimal Air Bubbles Resin Tutorial Epoxy Resin Crafts Resin Crafts Tutorial
West System Projects Table Top Applications Epoxy Resin Wood Epoxy Inside Diy

Epoxy Resin Casting Technique To Get Rid Of Air Bubbles No Pressure Pot Needed Epoxy Resin Pressure Pot Epoxy Resin Diy

Pin On Epoxy Resin Projects

Eat A Bubble Bubbles Spray Bottle Shampoo Bottle

Walnut Crotch Piece Ready For The Epoxy Pour Tomorrow Had To Remove A Lot Of Rot Punky Wood Treated The Edges With Epoxy To Prev Colored Epoxy Wood Bubbles

Water Bright Is A Fragment Venician Wood And Resin Light Of Variable Intensity Reveals Underwater Air Bubbles Inside The Wood Block Lamp Resin Furniture Wood

Water Bright Is A Fragment Venician Wood And Resin Light Of Variable Intensity Reveals Underwater Air Bubbles Inside The Resi Resin Furniture Resin Table Wood


